bits by luke
Rich Design
Rich Hickey delivered an excellent keynote presentation at ClojureConj 2023 titled “Design in Practice”. I want to summarize my thoughts about this presentation, and also walk through an abbreviated example of how I might leverage his techniques to improve my own design skills.
Note that the following is more or less plagiarism of Rich, for some definitions of plagiarism. My only intent is to solidify my own thinking through writing, and not to profit off of his work. The keynote is filled with gems of wisdom and practical advice, and you should certainly watch and learn for yourself.
Rich made it clear that he is not advocating for a new formal method for design nor is he proposing a “Rich Hickey Design” school of thought. However, I believe that his idea presents an opportunity for the software industry. By promoting the notion that proper design work is a continuous process, not just a short-term activity that takes place at the beginning of a project, I believe we can significantly improve the quality and effectiveness of software projects.
What better way to convince business stakeholders and management the value of design than through an official framework? The framework that Rich has created is a comprehensive process which can be applied by anyone to produce elegant solutions to complex problems. By using this framework, you achieve measurable outcomes and generate tangible artifacts that facilitate in the discovery, understanding, cooperation, documentation, and implementation of your designs.
I present to you the newest software design methodology: Rich Design.
An example
Let’s try and apply the principles of Rich Design to a small example.
We’ve been handed a “specification”, of sorts, and been told to implement a new feature according to the following:
We would like to build a flexible onboarding system that allows us to define
requirements and steps for a given user that they must (or optionally) satisfy
in order to be able to be allowed to be a substitute teacher at a given school.

The steps and requirements will vary most typically because of the specific
state (eg. California) that the user is interested in teaching. For example in
California the desired onboarding steps might be broken down into something
like:
- Depending on whether or not the user has a teaching credential, require a
  phone call with an employee before being allowed to proceed.
- Direct the user to a physical location to obtain a background check (also
  called a Livescan)
- Direct the user to a potentially different physical location to obtain a TB
  test
- Allow the user to submit evidence that the steps have been completed,
  typically receipts so that we can reimburse them for their up-front costs
  associated with becoming a substitute teacher.
- Provide evidence of a teaching credential.

Note that it typically takes users 1-2 weeks to move through all the stages and
users will receive emails to help walk them through it as well as likely logging
in multiple times to either check on their current status or to trigger a
transition to another stage in the process. Please see the appendix for some
early-stage mocks that our designer has come up with. It should help you get a
feel for what we’re trying to build.

Note that we would like to be able to experiment with our workflow. Ideally we
would be able to change around the order of steps, make some of them optional,
remove them entirely, or add new ones.
Any good engineer, normally, would interrogate the specification and look for problems or missing pieces, or ask for clarity on anything that doesn’t make sense. After a few back-and-forths with stakeholders we could reasonably expect to start programming soon and deliver on an implementation sometime thereafter.
We’re going to take a different approach today. We’re going to back away from the specification and start the design process over, from the beginning. We’re going to follow the Rich Design framework: describe, diagnose, delimit, direct, design, develop.
Interlude
Before we get started, we have to pause and generate our first two artifacts.
The first artifact is a top level ticket, something one would expect to find in any Project Management System. This ticket becomes an anchor for the rest of our design work, and receives updates regularly as we refine our understanding of the problem at hand. It also proves to the stakeholders that we are, in fact, doing work– as evident by the existence of a ticket in a system. It should look like this:
# Title
We arent able to define and verify requirements that a substitute must satisfy
before being allowed to teach at a particular school

# Description

(to be determined)

# Problem statement

(to be determined)

# Approach

(to be determined)
Notice that we can already fill in a first version of the title based on the information available to us in the spec. It’s not a great title– too wordy and imprecise, but we don’t yet know enough to do better.
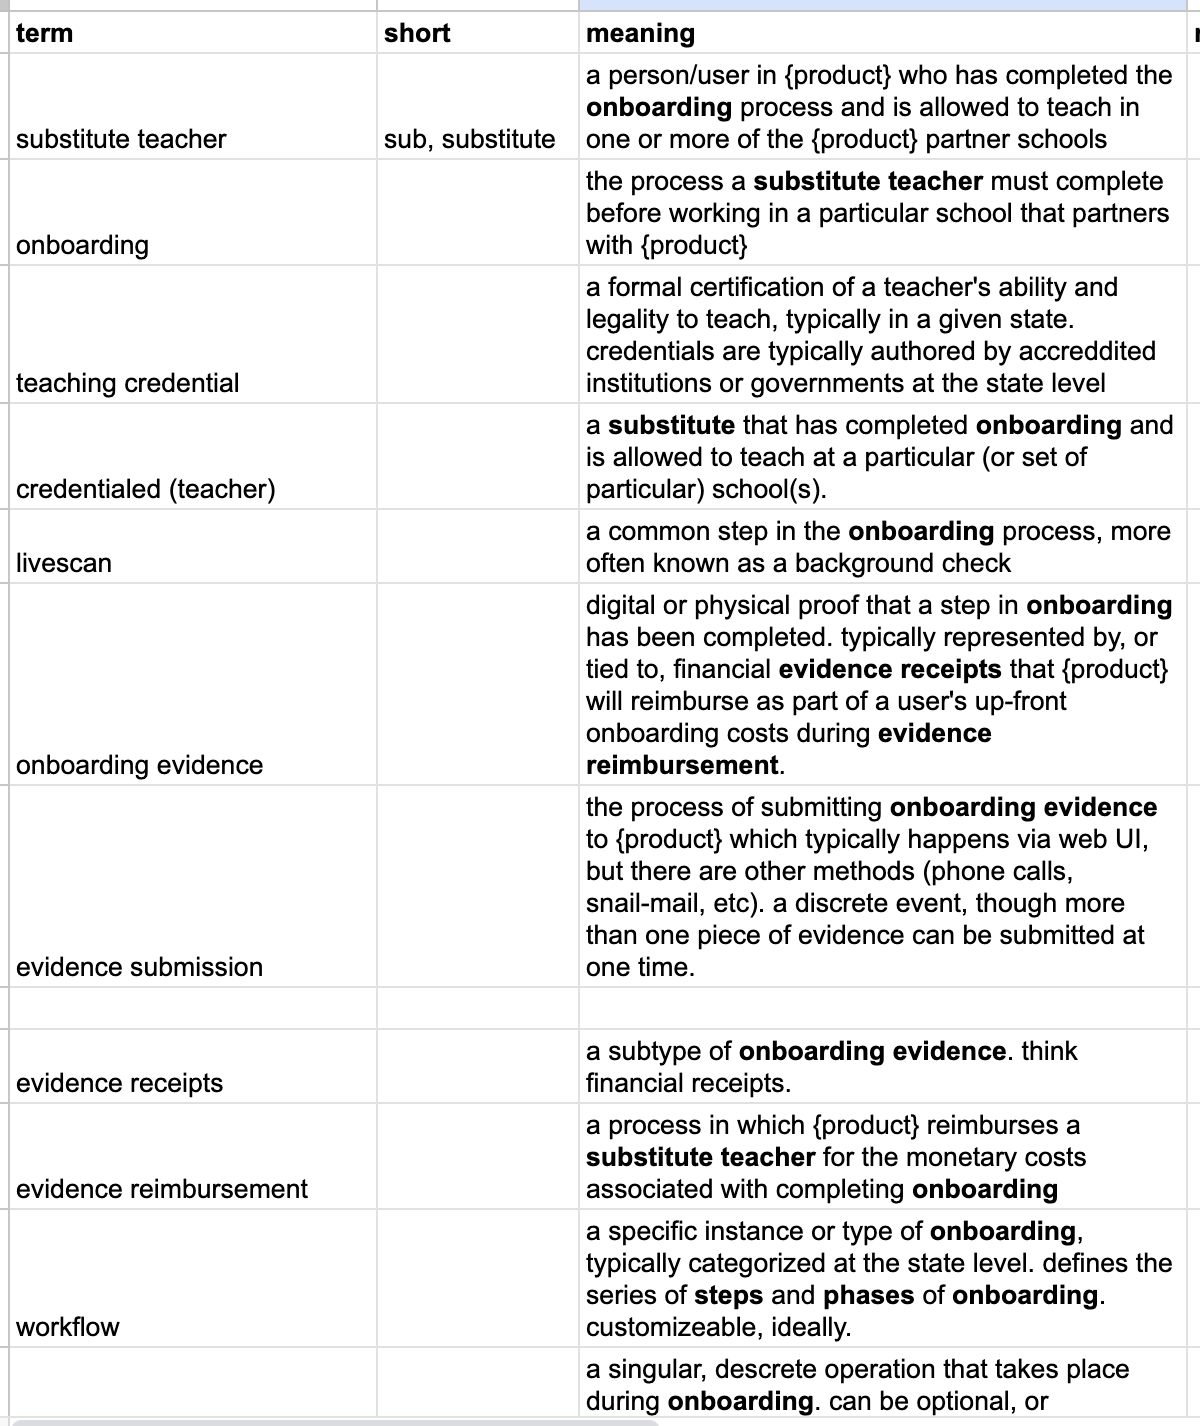
The second artifact is a glossary. There must be a single document that contains a list of all domain-specific definitions. It must remain up to date throughout the duration of a project. Select precise words with quality names to define your domain. If you are struggling to accurately and concisely define terms in your domain, this is telling you something. You probably haven’t established a common understanding, or you need to untangle complected ideas. It might look something like this:
Describe
We need to contextualize the situation. We can’t assume to know what the problem is– it’s far too early in the design process. Internal and external users are complaining. Something is wrong with the system. Some feature might be missing. Some documentation might be wrong that’s confusing customers. Let’s gather stories, evidence, and conversations to describe our situation in an evidence document:

Diagnose
Now that we have a clearer description of the situation and evidence of the symptoms, let’s investigate the possible causes of the problem. Explore the information available. Are there patterns or similarities? Try to discover a user’s objective, not the process by which they might accomplish the objective. Don’t take a user report or a feature request as a fact: “we don’t have feature X” is never a valid outcome of a diagnosis. If there is a consistent stream of feature requests, try to uncover the problem for which a new feature might be one possible solutions. As Rich Hickey says, this “moves you from a closed set of features to an open set of possibilities”.
Given the evidence document describing the situation, I believe a fair diagnosis of the problem follows:
A promise of our platform is access to credentialed teachers.
Engineering/implementation aren't able to ingest novel customer onboarding flows
into the platform "quickly", or provide reliable deadlines to customers on when
this work will complete. This is causing us to lose sales to districts, and is
limiting access to our potential substitute pool.
Notice that in our diagnosis we haven’t mentioned anything about solutions. We have only developed context and understanding around a set of issues, and are now providing a clear diagnosis of the problem. We can return to the top level ticket and fill in the description!
# Title
We arent able to define and verify requirements that a substitute must satisfy
before being allowed to teach at a particular school

# Description
A promise of our platform is access to credentialed teachers.
Engineering/implementation aren't able to ingest novel customer onboarding flows
into the platform "quickly", or provide reliable deadlines to customers on
when this work will complete. This is causing us to lose sales to districts, and
is limiting access to our potential substitute pool.

# Problem statement

(to be determined)

# Approach

(to be determined)
Delimit
Having described and diagnosed our condition, we can actually commit to solving a particular problem.
The next artifact we produce is critically important, the problem statement. Provide a succinct statement of unmet user objective(s) and cause(s). We’re not talking about solutions or features, or symptoms and wants– strictly describe the problem at hand that we are going to solve. From this point forward, the problem statement should be the single point of focus for every activity. Keep it in front of you at all times.
Implementation needs the ability to ingest customers with novel onboarding
requirements in a quicker, more predictable manner.
We can return to the top level ticket and fill in both the problem statement and a better title! Take a moment to appreciate the concision and precision of the ticket we have generated by following Rich Design.
# Title
More predictably and quickly ingest customers with novel onboarding flows.

# Description
A promise of our platform is access to credentialed teachers.
Engineering/implementation aren't able to ingest novel customer onboarding flows
into the platform "quickly", or provide reliable deadlines to customers on when
this work will complete. This is causing us to lose sales to districts, and is
limiting access to our potential substitute pool.

# Problem statement

Implementation needs the ability to ingest customers with novel onboarding
requirements in a quicker, more predictable manner.

# Approach

(to be determined)
Direct
Only now that we have a clear and concise problem statement can we begin working on strategies and approaches to solving that problem. Focus on intentions and objectives. Try to capture the desires of users, not the features: “I wish I could…”, “I want to be able to…”. This is nuanced, but do not get caught up in how a user might solve the problem in the system (“click and drag widget from here to there”). Instead, think about what capabilities can be exposed to enable a user to solve the problem (“the ability to reorganize widgets”). Ensure the problem statement remains front and center. Capture this information in another artifact, a use cases document.
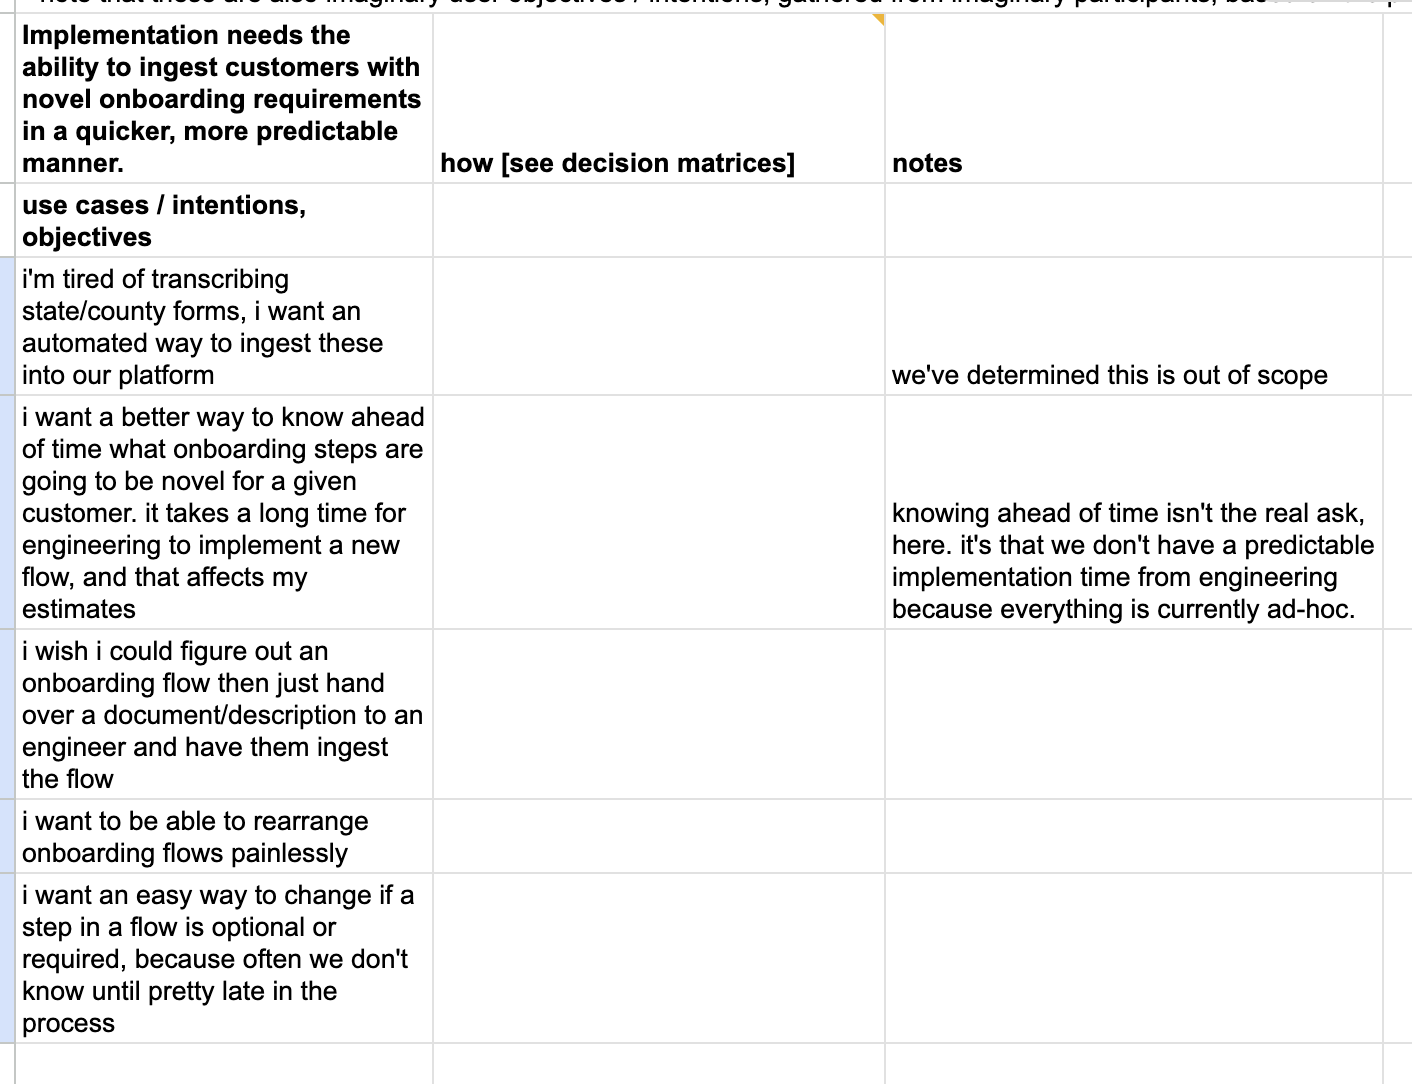
Notice that we have not filled in the “how” column above. It’s too early to do that. We are maintaining focus on the objectives, not the implementation. This doesn’t have to an arduous or comprehensive task– you aren’t boiling the ocean to find every possible use case. Stick to the more common wants and wishes.
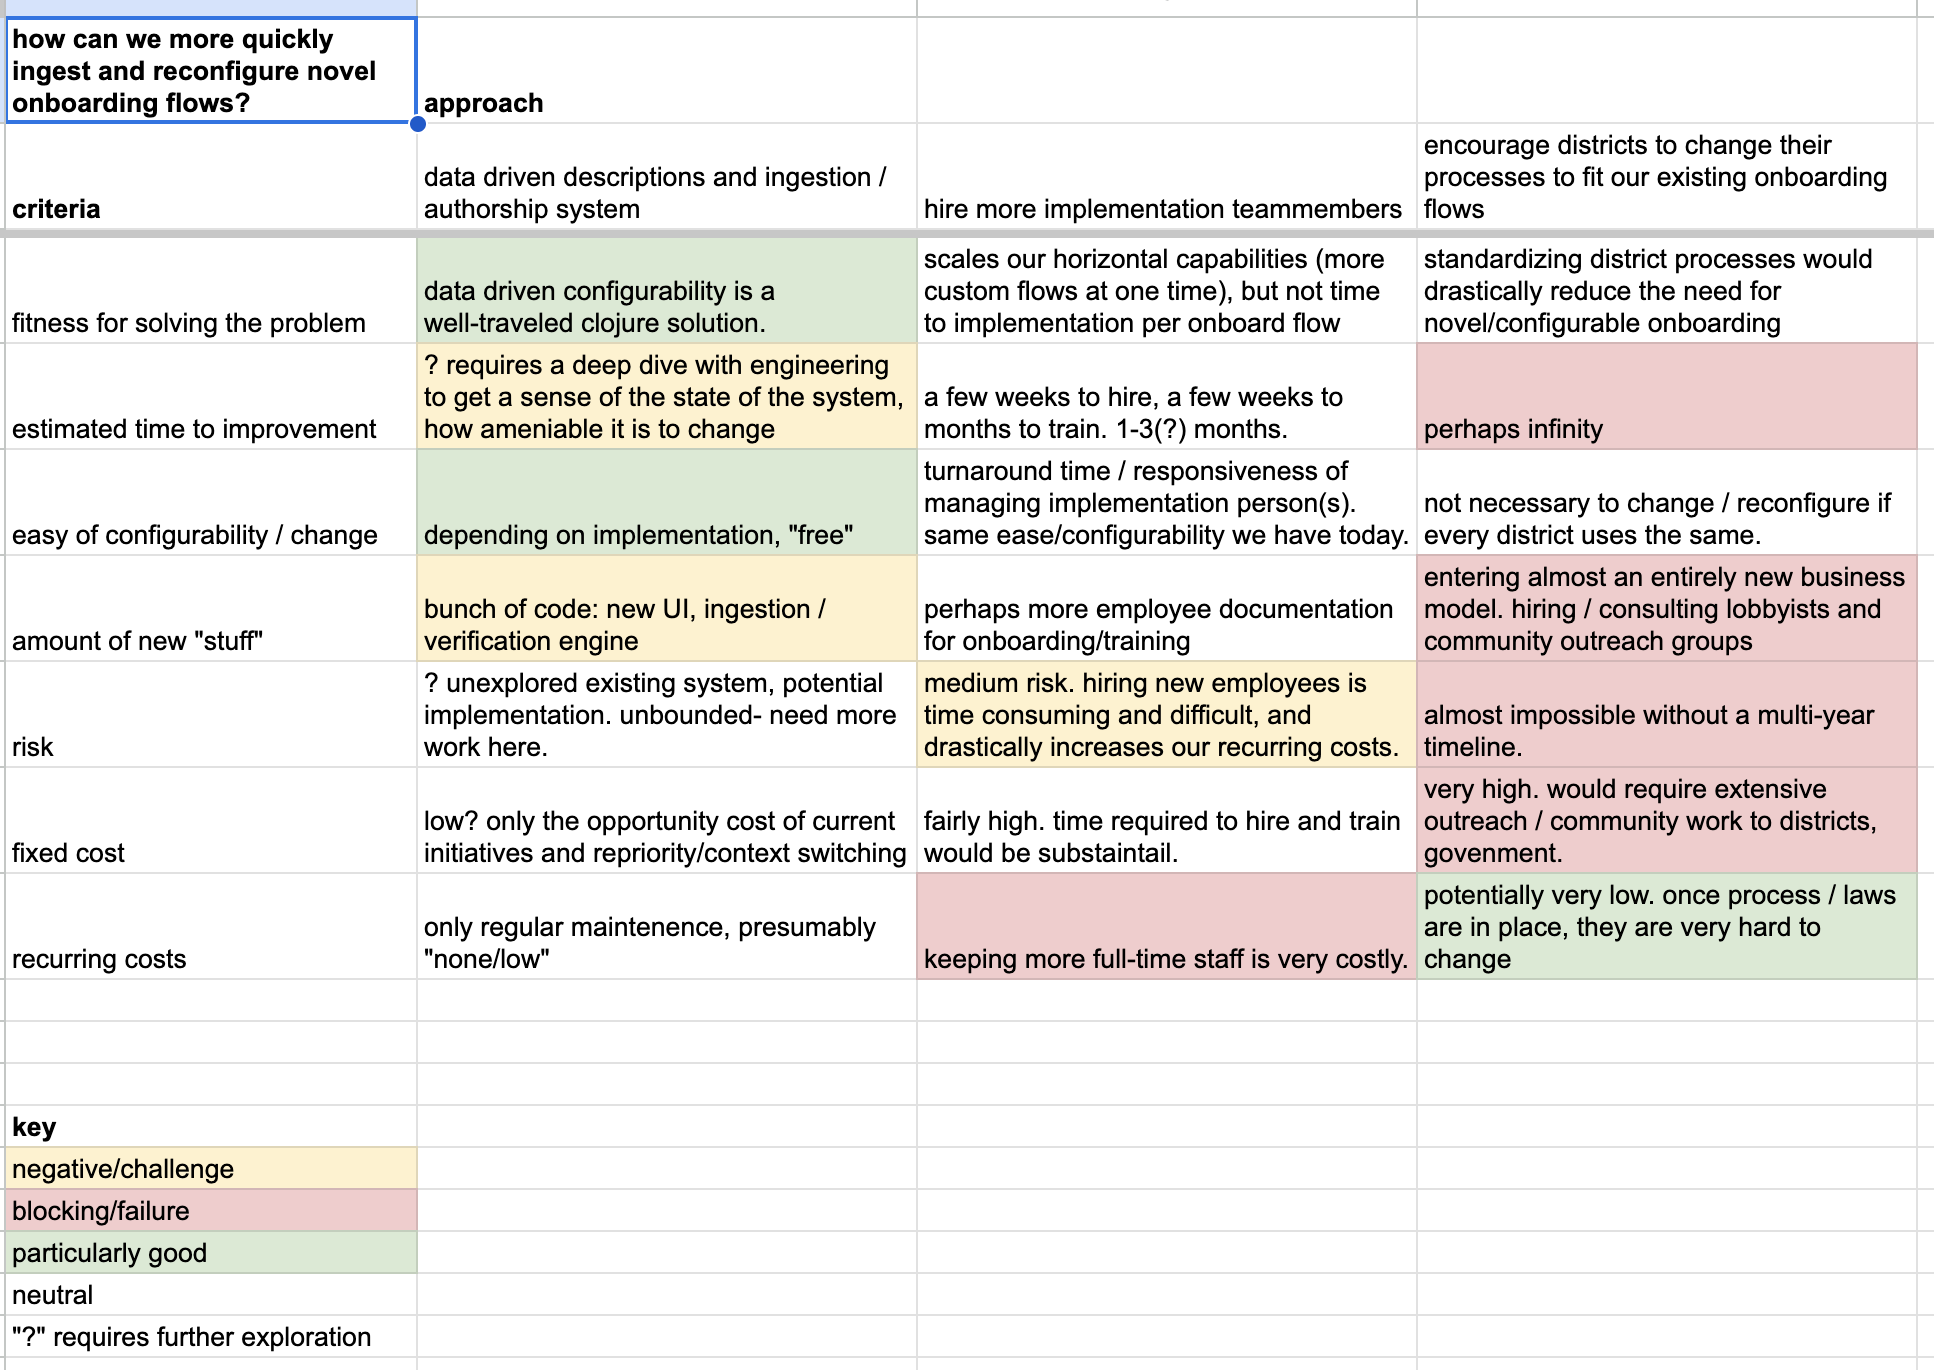
After outlining our use cases and aligning them with the problem statement, we can begin to create additional artifacts called decision matrices (DM). DMs help generate and document potential approaches to solving the problem statement.
At this point I would recommend rewatching Rich’s points on decision matrices at ~39:09. He explains the intentions and criteria of this artifact in great detail. I will note, however, some important points: the problem statement (or the decision under investigation) is front-and-center at A:1. Also, the rows are sorted and color coded in order to make this easily digestible for yourself and coworkers. Continuing our example, here is the decision matrix focused precisely on approaches to solving our problem statement:
Design
We are finally at the step of “design” in the Rich Design framework. At this point I hope I have convinced you that the term “design” should encompass much more than what is currently assumed. We have generated a plethora of useful artifacts prior to this step, all of which will heavily influence our work:
- a ticket representing the work we’ve been doing, and what still needs to be done
- a glossary of shared domain knowledge
- a collection of evidence pointing to a problem in our system
- a succinct description of the exact problem
- a set of use cases describing what we’d like to be able to do in order to solve the problem
- a decision matrix outlining several approaches that might solve the problem, with their tradeoffs
Without these artifacts, where would we be in our design process? Do you believe me when I say that every engineer I have ever worked with in my career would prefer having this list of artifacts over the original specification? Do you expect the outcomes of this design step will be simpler, more robust, and more generalized?
It’s in this step that we get to perform all the tasks usually associated with design. Draw some diagrams and design plans! You get to use arrows and boxes and disk-shaped things in your favorite diagramming tool. Explore the relationships, flows, architectures, and UIs that satisfy the approach’s requirements. Create more decision matrices for particular implementation approaches. These can be very lightweight, but they document the tradeoffs and help clarify thinking.
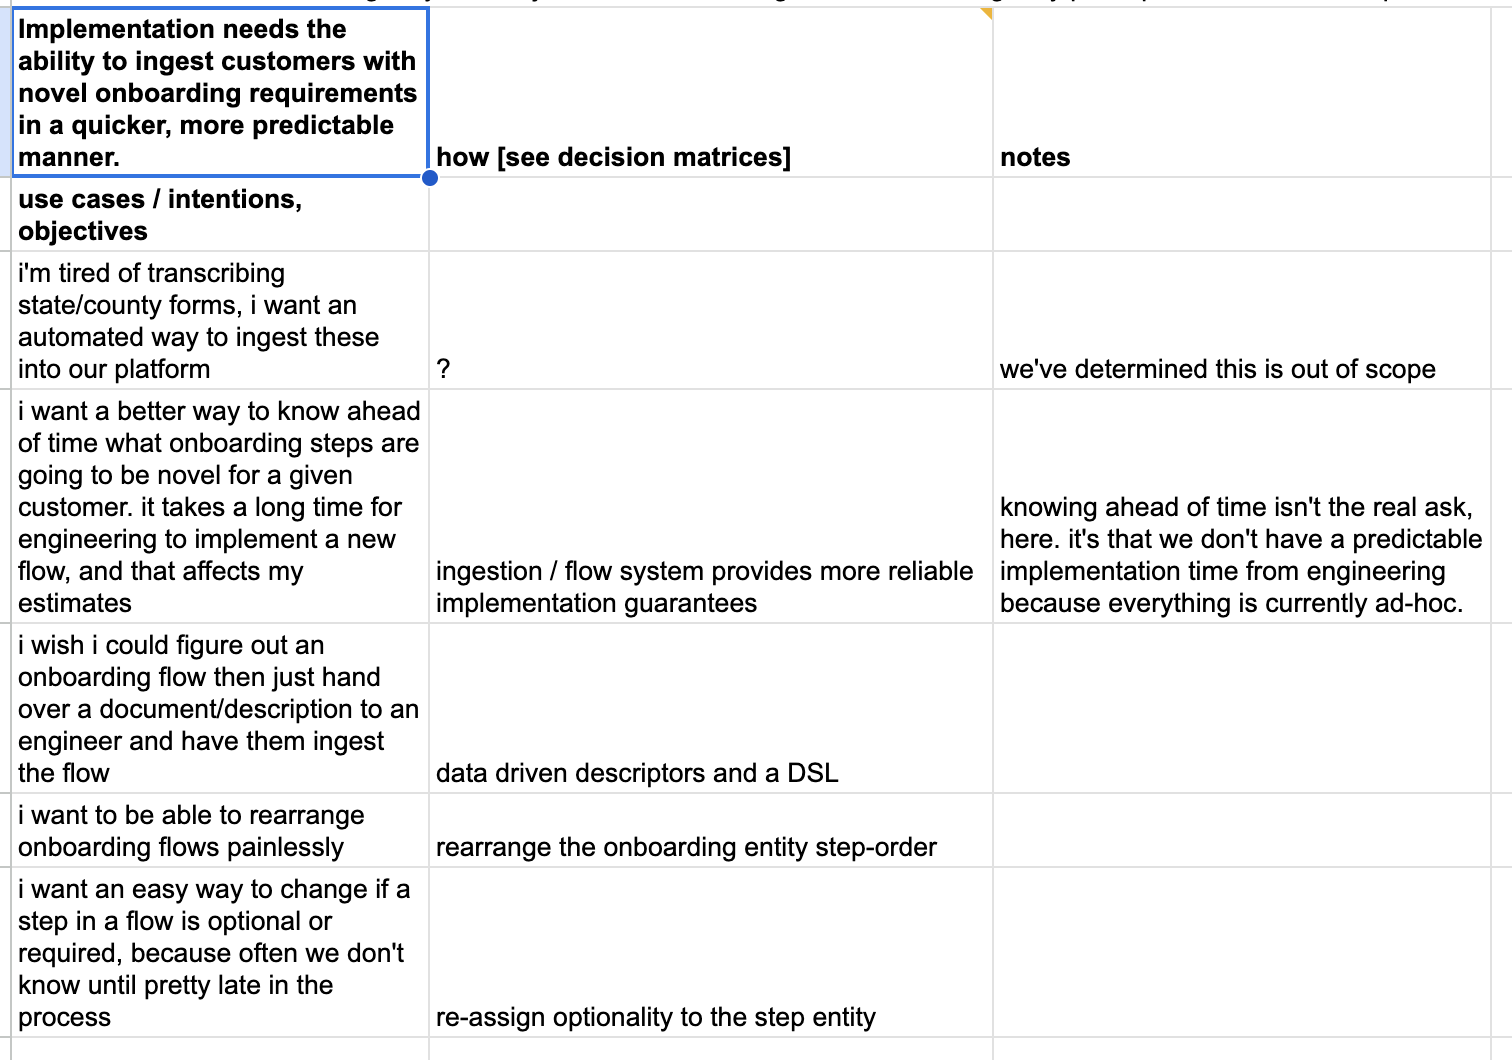
After designing the approach we can go back to the use case document and fill in the “how” column with well-reasoned, informed answers.
We can also return to the top level ticket and fill in the final section with all the artifacts generated from the design step.
Develop
Lastly, almost inconsequentially, we have the opportunity to do some development work. We can finally scratch that itch we’ve been feeling to open the terminal and slam down some code.
But first, let’s take a moment to appreciate how far we’ve come. We started with a few paragraphs under specifying some semblance of a feature. Why were we building this thing? Did we have reason to believe this thing will fit into our system? Could we assume the thing actually solves the problem? Could we verify that we actually know what the fundamental problem is?
By applying Rich Design we have gained:
- a stronger sense of autonomy (we had a stake in identifying the problem and exploring potential solutions)
- a better sense of purpose (we’re building this because the integrations team is struggling and they need a new feature)
- confidence that we’re solving an underlying problem, not just a symptom (we have evidence proving the former)
- confidence in our implementation (we’ve evaluated many possible approaches and this is the best for our system)
- documentation (why decisions were made, diagrams on architecture, glossary of the domain, etc.)
- a clear direction for implementation (we have a pile of supporting material to keep us on track)
To close, I’m not going to write enough code to completely satisfy the problem statement. Given the simplicity of clojure data literals, and the straightforwardness of small, composable functions, I feel that an implementation is almost self-evident. We can reingest the Rich Design artifacts and start a clojure implementation, but it’s admittedly pretty boring:
; what does a workflow look like? a map, of course!
#:workflow{:id "" ; uuid uniquely identifying a workflow
           :ident :CA-district-19A ; human identifiable alias for a workflow
           :version :v2023-03-05 ; identifies a stamped/minted version of an immutable workflow (enables changes to workflows over time, record keeping)
           :current-step "" ; uuid pointer to the current step a substitute is currently working on, or waiting for
           :step-order [ 'uuid1 'uuid3 'uuid2 'uuid4 ] ; an ordered vector describing the strict series of steps in an onboarding flow
           :complete? false ; boolean indicating if the assigned substitute-id has completed the onboarding
           :substitute-id "" ; uuid identifying the substitute teacher assigned to complete the onboarding instance
           :started? false ; boolean indicating if the assigned substitute-id has begun the onboarding
           :started-at "2023-05-03 12:00:00Z" ; timestamp marking the moment our system learned the substitute completed the onboarding
           :completed-at "2023-05-05 12:00:00Z" ; timestamp marking the moment our system learned the substitute began onboarding
           }

; what does a step look like?
#:step{:id ""	; uuid uniquely identifying an instance of a step
       :action :proof-of-insurance	; the activity a substitute must complete	chekr-validation, covid-vaccination, livescan, proof-of-insurance
       :complete? false	; boolean indicating if the assigned substitute-id has satisfied the step
       :assignee ""	; uuid of the substitute assigned to complete this step
       :version	"v2020-01-04" ; identifies a stamped/minted version of an immutable step (enables changes to steps over time, record keeping)	:artifact-ref "s3://domain.artifacts...credentials/1234-proof-of-vaccination" ; a link to the digital proof (receipt, photo, credential URI, etc) that satisfied the requirements of this step	:optionality :optional	; identifies if a given step is required, optional, undetermined, etc. to progress to the next step in an onboarding flow
       :deadline "2023-05-30"	; a timestamp indicating that a given step must be completed before a particular moment in time
       }

; what capabilities might a consumer want?
(current-step workflow)
(next-step workflow)
(progress-to-next-step workflow)

; how do we handle inbound/outbound side-effects for a step's actions?
(defmulti emit-step-side-effect :action)
(defmethod emit-step-side-effect [:chekr-validation] [_]  (email.outbound/send { ,,, })

(defmulti receive-step-side-effect :action)
(defmethod receive-step-side-effect [:chekr-validation] [validation]  (-> validation (authenticate) (confirm) (store))
(defmethod receive-step-side-effect [:proof-of-insurance] [receipt]  (-> receipt (authenticate) (receive) (record))

,,,
The resulting code is straightforward, simple, and exactly what we’re looking for. Thanks Rich.